If you have recently been through some type of storm, you might be looking for a roof storm damage checklist. Storms can cause roof damage, regardless of the precautions taken. Most roofs are built to withstand certain environmental factors, but that does not mean damage will never happen.
Roof storm damage is often caused by standing water, wind, hail, or flying debris. If you live in a climate with heavy snowfall and your roof is not sloped or sloped at an angle where the snow does not naturally fall off the roof, damage can occur due to excessive weight on the roof.
When many people think about roof damage, they picture hurricanes or tornadoes, but hail is also a major culprit. Understand that just because you are not in a climate that produces earthquakes, hurricanes or tornadoes does not shelter you from elemental roof damage. In 2020, State Farm paid out 3.1 billion dollars for property claims related to hail. In April of 2021, a series of hail storms in Texas caused 1.2 billion dollars worth of damage.
If you are concerned about roof damage due to weather events, keep reading, as this article will provide a step-by-step guide on accessing your roof for problems and issues.
Common Causes of Roof Damage
To create a roof storm damage checklist, you will need to understand common types of roof damage and how to check your roof for signs of damage.
Although a roof can be damaged in multiple ways, the four most common culprits are hail, wind, standing water, and debris. We will look at how each of these things can damage your roof.
Rainstorms: Although rain can seem harmless, there are multiple ways a rainstorm can damage a roof. These include causing leaks and cracks, damaging shingles, helping create an atmosphere right for mold growth, clogging gutters, freezing into cracks, and expanding to create additional damage.
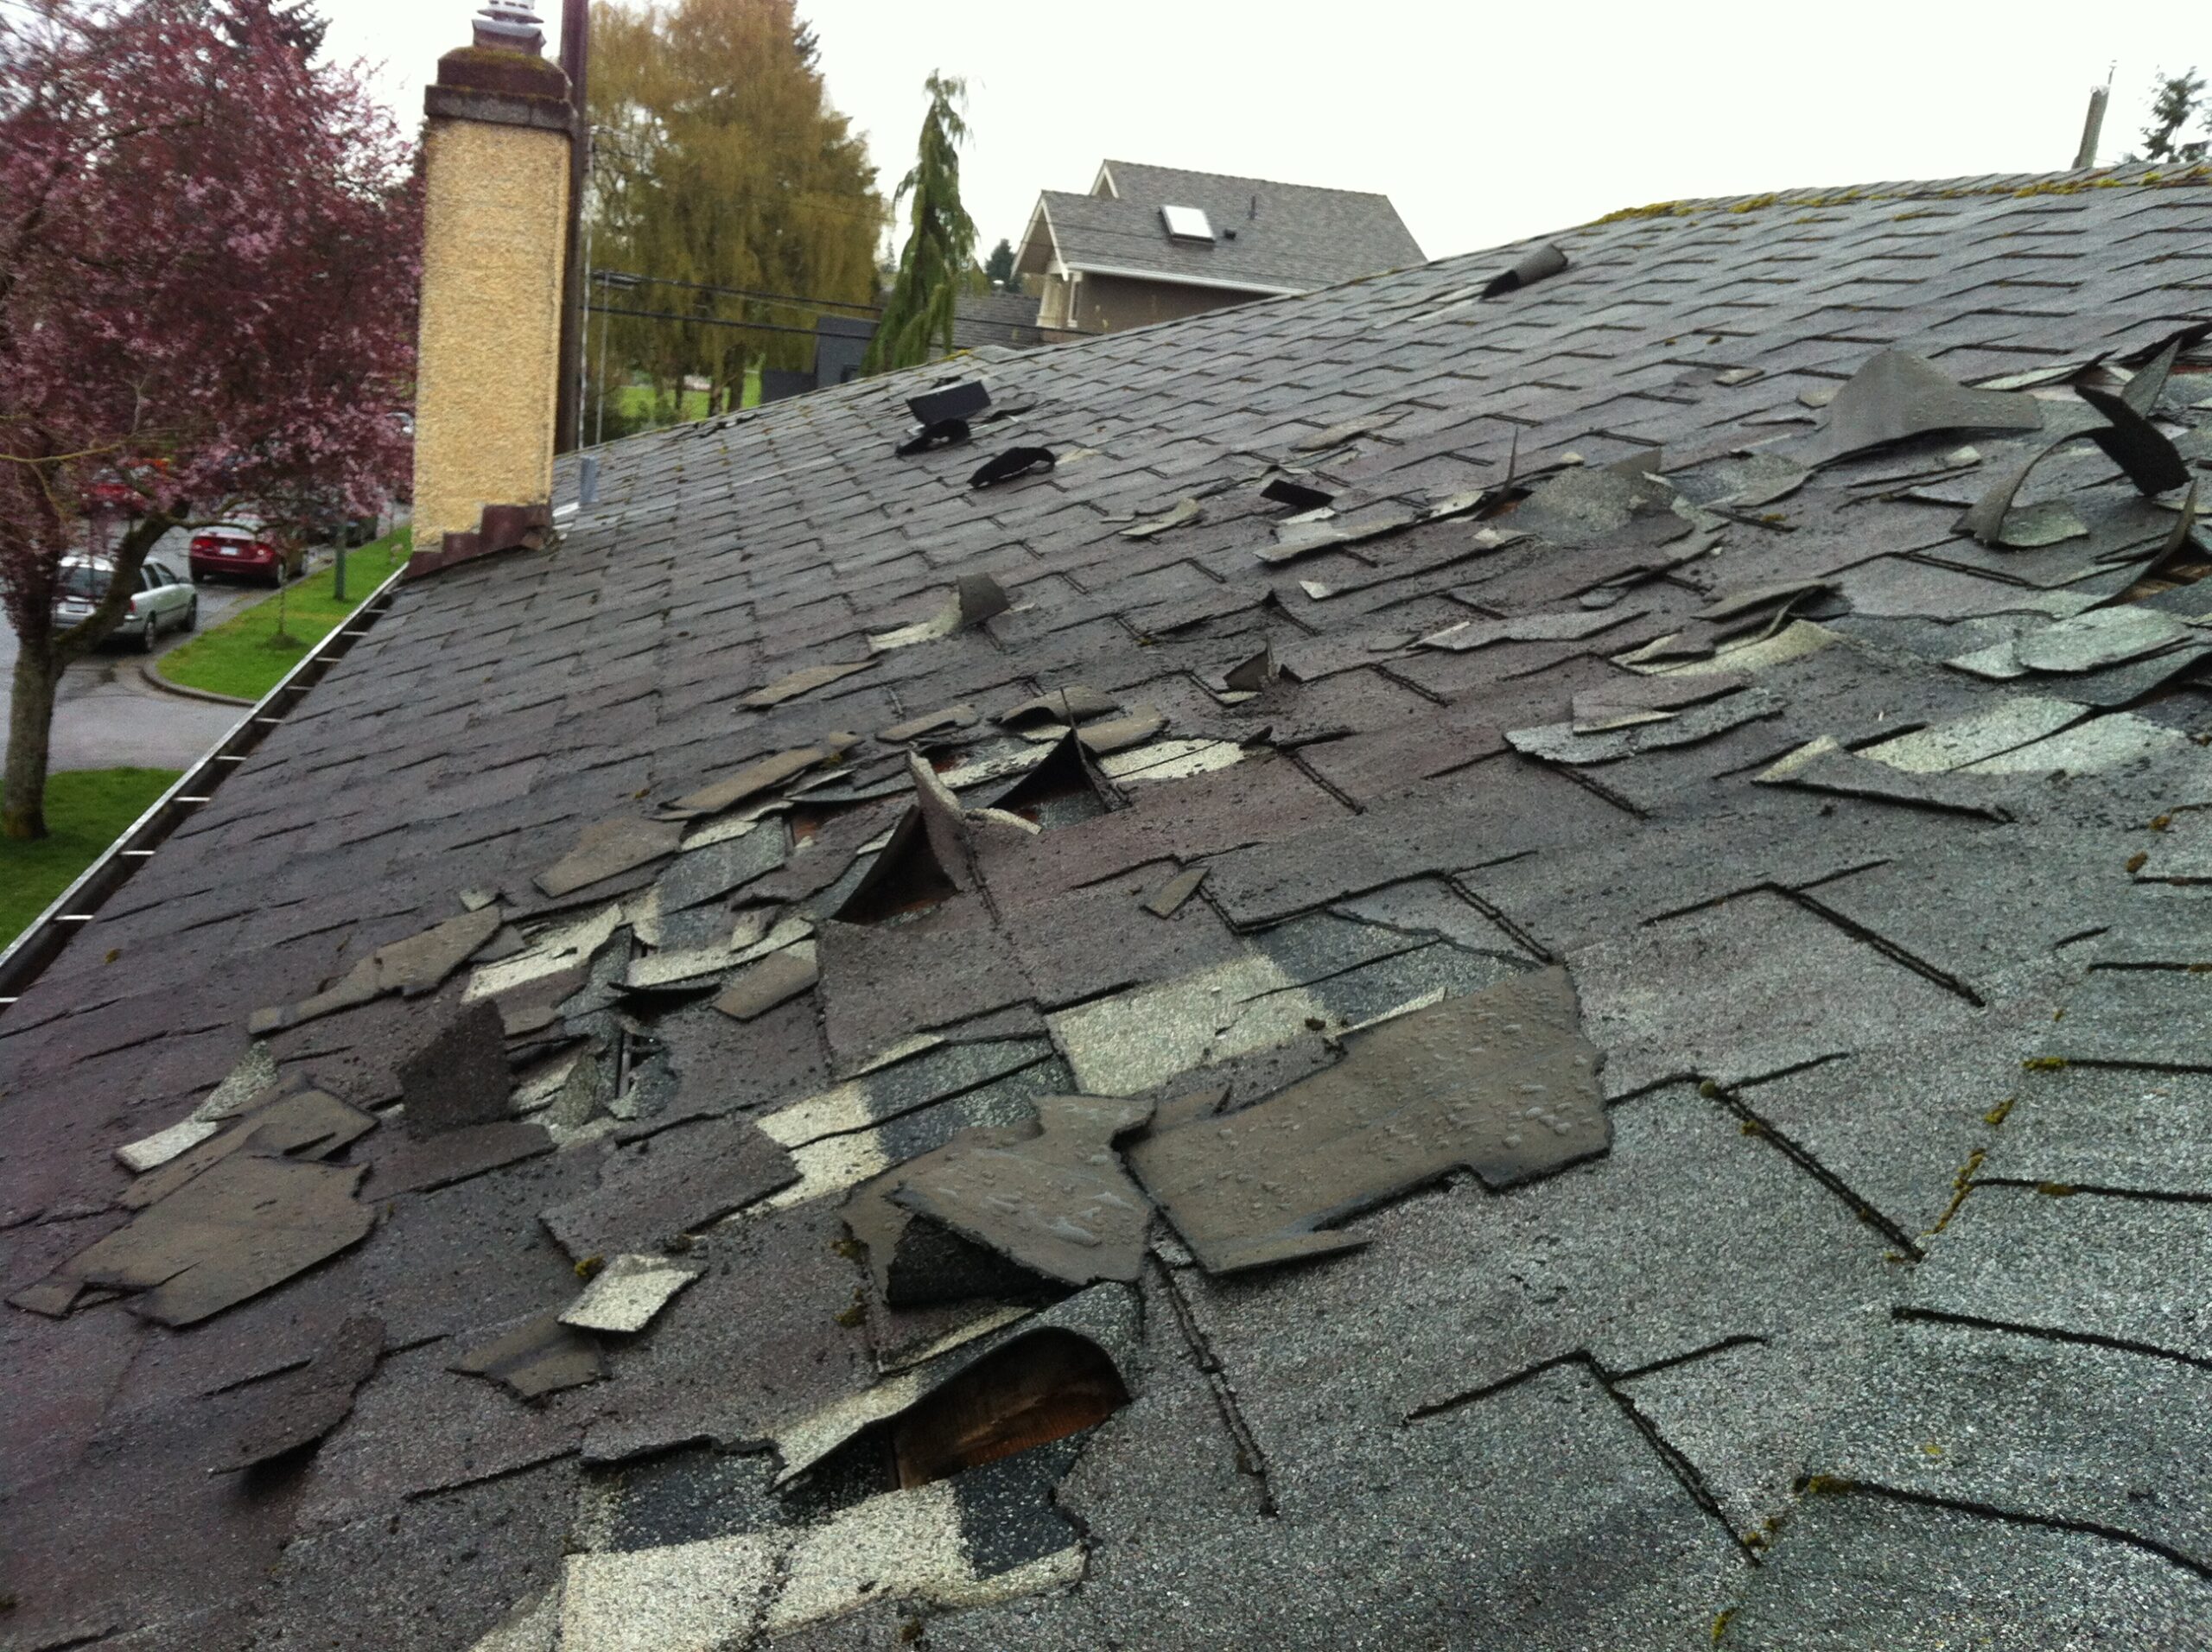
Hail: Hail is a common cause of damage. The force of hail can affect the roof by split shingles, even ones that previously showed no signs of deterioration. The size of the hail does not determine if damage will occur. Some hail is as tiny as the size of a pea but can still cause damage. Although hail appears to be circular in nature, it is not smooth. Hail has sharp edges, which can cause severe damage to the shingles or even underneath the underlayment, which is responsible for keeping the elements out of your home.
Standing Water: Standing water is typically an issue for roofs without proper drainage (such as clogged gutters). The water can work under the shingles, allowing moisture to seep into the underlayment or the roof deck.
Debris: Debris usually happens in high-wind storms where the wind picks items up off the ground and forcefully hits your roof. The higher the wind, the heavier the items can be. The wind can tear off shingles and cause cracks and other damage. The debris can do this and more depending on the debris’s weight and the impact’s force.
Finally, when creating a roof storm damage checklist, you will want to check six specific spots on your roof for signs of potential problems or damage.
- Look for missing or damaged shingles. Damage could include curled, cracked shingles or showing signs of decay.
- Look for cracks, tears, or blisters. This is especially important on flat roofs.
- Chick the chimney to ensure the cap is tight and if made of bricks, look for cracks.
- If you have a skylight, check for damage around the skylight, as this is a weak point of entry.
- Check the gutters to ensure they are free from debris and are still tight against the home.
- Make sure the ventilation caps are clear and have no obstructions.
Step 1: Check for Water Damage in Your House
Step 1 of the roof storm damage checklist is checking for water damage in your home. There are six ways to evaluate your ceiling for water damage. When looking for damage, you should start with the ceilings of your rooms, then move to the attic. Here are the things to look for in the ceilings:
- Water Stains: Look at all your ceilings and look for water stains. They will be noticeable with a brown or yellow stain (usually circular). These could be leaks from the roof or the plumbing.
- Drooping Ceiling: If the water damage is significant, you may notice drooped ceilings.
- Musty Odors: Even if you do not see any damage, you can still detect water damage from a new musty order in your home. If the house smells of mildew or mold, this could be a sign of water damage.
- Condensation Droplets: Another sign of water damage is when the ceiling produces condensation droplets.
- Cracked or Bubbling Paint: Even when water is not apparent, the damage could be detected when paint or wallpaper suddenly bubbles beneath the surface.
- Warped Portions of a Room: You should look for warped parts of a room.
Understand that any moisture detected in your ceiling can lead to more significant issues, such as structural damage or mold creation. Once you inspect the ceilings in your home, you should move on to the attic. When looking for damage to the attic, start outside. See if there are signs of trouble, like clogged gutters, rotting wood, or cracks. Inside you will look for leaks, pooling water, or any of the same six spots you looked at for your ceilings. Don’t forget to use all your senses, not just sight. Your sense of smell may tell you that there is a potential problem first.
Step 2: Check Your Roof For Any Sign of Damage
Step 2 of the roof storm damage checklist is to look for any signs of damage. Many different things could be considered roof damage, such as sagging, shingle loss, and gutter rust. Here are some signs you will want to look for.
- Gutter Rusting (could indicate a damaged roof or standing water)
- Missing nails. If you can see the nails protruding or if there are in your surrounding property, there is likely also a shingle problem.
- Missing or Damaged Shingles. This is not just a cosmetic problem; then the shingles are damaged, you could face water issues now or down the road.
- Moss or mold could indicate water damage or standing water.
- Signs of Sagging. This could be a big problem if the roof’s structure is compromised.
- Issues are seen in your attic.
- Issues are seen in your ceilings.
- Damaged vents.
After you access your roof, you will want to make temporary fixes. Next, call your insurance company and report the damage. You may also want to call a roof repair company; however, if insurance is involved, you should inquire if you can contact someone or if you need to wait for their representative to assess the damage first.
Step 3: Inspect Your Chimney
Step 3 of the roof storm damage checklist is to inspect your chimney. During a storm, a chimney can take water damage, and it can lead to problems. Here are the three reasons why water damage is dangerous for a chimney:
- Water damage can weaken the chimney structure. This is problematic because joints and bricks can become soft and then crack or crumble.
- Water damage can cause a chimney to leak. A weakened chimney can leak water into the some, causing structural problems.
- A chimney with water damage can produce mildew or mold.
If you want to prevent chimney leaks in the future, you can look at the common components that lead to this issue and address them. Keeping the chimney cap, crown, bricks, mortar joints, and metal flashing healthy will help you avoid damage. It will help if you start by ensuring these components are not damaged in any way, including looking for cracks and chips. Calling a chimney repair service is the best course of action when you see the damage.
Another way to ensure you have less chance of incurring chimney damage is to consider a waterproofing service. Waterproofing will provide an extra layer of protection, making your chimney up to 99.9% moisture free.
Step 4: Check Your Roof Vents
Step 4 of the roof storm damage checklist is checking your vents. There are seven different types of roof exhaust vents. If you do not know which one yours is (or what it looks like), you may need a description to find the vent. Here are the types of roof vents:
- Ridge Vents: This is the most common type. It is located at the roof’s peak and spans the roof line.
- Off Ridge Vents: This one is also at the roof’s peak. It is installed with a three-tab asphalt shingle.
- Box Vents: The name comes from their look. You will find three box-shaped vents near the roof’s peak if you have box vents.
- Hard-Wired Attic Vents: They are powered by electricity to pull stale air out of the attic. They are effective but cost more in utility bills.
- Solar Powered Attic Vents: These are the more modern attic vents, allowing almost no electricity use.
- Roof Turbines: These are often referred to as whirlybird vents; they are striking and can easily be seen from the ground.
- Cupola Vents: They look like cute towers on top of a home. It is the least common because of the cost.
Now that you know what your vent may look like, it is time to look for leaks. The easiest way to find a leak is to go and inspect the vent and look at the area around it. You will see a dark spot near the vent if there is a leak. You may also notice a problem in the attic. From the attic, you might smell a musty odor, or you may see mold growth.
Step 5: Check Your Windows and Gutters
Step 5 of the roof storm damage checklist is to check your windows and gutters. Only some things about storm damage are about the main roof; sometimes, the smaller items we are not thinking about can also face damage during a storm.
One of the main ways your windows can be damaged is by having hail hit them during a storm. Hail can shatter windows, but it can also cause cracks, dents, or tears and damage screens.
Damage by hail can be understandable. Hail is sharp flying projectiles; damage can happen. However, rainwater from simple rain storms can also cause damage to both your windows and gutters. A straightforward way for damage to occur is if your windows already have any cracks or if the weatherstripping is worn or not properly installed; water can get into your home. Of course, rain storms can make the cracks bigger as well.
The gutters can also overflow with rain and debris. If your gutters overflow, this can cause damage to both your siding and your roof. Excessive rainwater can also cause the gutters to sag, crack or break.
Finally, wind can also cause significant damage to windows and gutters. Wind storms can result in shattered or cracked windows and window frames. Winds can also damage gutters, including breaking, cracking, or pulling them off the home. It is possible to avoid this by having gutters reinforced to your house.
Step 6: Inspect Your Shingles
Step 6 of the roof storm damage checklist is to check your shingles. Shingle damage is the last place you need to look after a storm. First, you will want to look for shingle damage.
Typically, you can do this from the ground. Look up at your roof and see if there is any obvious damage. You will be looking for missing, cracked, or broken shingles. You may notice splitting or decay if the shingles are made of wood. For all other shingles, you may see that they are beginning to curl.
For missing shingles, you may notice some came off the roof and are in your yard or driveway. You may also find them in your gutters (causing an obstruction). Finally, you may see things related to shingle damage, like loose nails or screws.
Another problem to look for is shingle granule buildup. You would discover this issue by seeing the granules (which are added to shingles to protect against UV light or to be a fire retardant) in your gutters. If the granule builds up, the gutters will not be able to do their job, resulting in standing water on your roof. Some people invest in leaf screens to prevent granule buildup from occurring.
Final Thoughts
By following this roof storm damage checklist, you will be able to quickly discover if your roof sustained any damage during a storm. Damage to your roof needs to be addressed as soon as possible, as it will only worsen over time.
Even if the damage is not to the roof but to other items like your chimney, windows, or gutters, this can ultimately cause problems for your roof down the road.
Most damage is done by wind, rain, standing water, hail, and debris. So, if you have had a recent storm that included any of those elements, you will want to consult the checklist soon.